Tag - Arduino Uno

Interfacing HC-05 Bluetooth Module with Arduino Uno

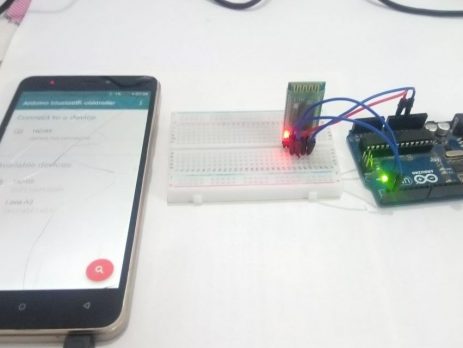
In this tutorial, I will explain about Interfacing HC-05 Bluetooth Module with Arduino Uno. HC-05 uses bluetooth classic and can be configured in master or slave modes. It can be interfaced with a microcontroller using UART. Components Required Arduino UnoHC-05 Bluetooth ModuleLEDJumper WiresBread Board Software Required Arduino IDEAndroid App - Arduino Bluetooth Controller HC-05 Bluetooth Module HC-05 Bluetooth Module Operating Voltage : 4 V to 6V (have internal 3.3V regulator).Operating Current : 30mAIntegrated antenna and an edge connector.Range about 10 meters.Configurable in both master and slave modes.Pins...

Interfacing DHT11 Temperature and Humidity Sensor with Arduino Uno

In this tutorial we will learn about Interfacing DHT11 Temperature and Humidity sensor with Arduino Uno. The term DHT is an abbreviation of Digital Humidity and Temperature sensor. DHT11 consists of a resistive humidity sensor, NTC temperature sensor and an 8-bit microcontroller providing cost effectiveness, anti-interference ability, excellent quality and fast response. Components Required DHT11 SensorArduino Uno0.96 inch OLEDBread BoardJumper Wires DHT11 Temperature and Humidity Sensor DHT11 Temperature and Humidity Sensor Module - PIN Diagram Specifications Operating Voltage : 3V ~ 5.5VTemperature range : 0...

Interfacing L298N Motor Driver with Arduino Uno

In this tutorial we will learn how to interface L298N motror driver with Arduino Uno. You might be thinking why we need L298N for controlling a motor. The answer is very simple, Arduino board or a microcontroller IO pins don't have enough current/voltage driving capability to drive a motor. For driving the motor in both directions (clockwise and anti-clockwise) we need to use an H-Bridge. Please read our article H-Bridge - DC Motor Driving for more information. L298N is an...

Interfacing Mercury Tilt Switch with Arduino Uno

In this tutorial we will learn how to interface Tilt Sensor with Arduino Uno. As the name suggests, it is an electronic device used to detect the orientation or tilting of an object and provides digital output based on the orientation. It behaves like a normal ON - OFF switch that is controlled by tilting. Tilt sensor consists of a mercury ball and two contacts in a sealed enclosure, in which the mercury ball will short the leads based on...

Interfacing Servo Motor with Arduino Uno

In this tutorial we will learn how to interface servo motor with Arduino Uno. Servo Motor is an electrical linear or rotary actuator which enables precise control of linear or angular position, acceleration or velocity. Usually servo motor is a simple motor controlled by a servo mechanism, which consists of a positional sensor and a control circuit. Servo motor is commonly used in applications like robotics, testing automation, manufacturing automation, CNC machine etc. The main characteristics of servo motor are...

Interfacing Ultrasonic Sensor with Arduino Uno

In this tutorial we will learn about integrating HC-SR04 ultrasonic distance sensor with Arduino Uno. Ultrasonic sensors are commonly used for obstacle detection and distance measuring applications. The sensor works on the same principles of a radar system, which converts electrical energy into acoustic waves and vice versa. The HC-SR04 ultrasonic sensor is based on the principle of SONAR, which is an abbreviation of Sound Navigation Ranging. This sensor is used in many hobby projects where there is a need...

Interfacing MPU-6050 / GY-521 board with Arduino Uno

About MPU-6050 MPU-6050 is a chip manufactured by Invensense which combines 3 axis accelerometer and 3 axis gyroscope with an on-board digital motion processor. It also includes a embedded temperature sensor and an on chip oscillator. It is very accurate and consist of analogue to digital conversion hardware for each channel thereby capturing x,y,z channels at the same time. The arduino can be interfaced with I2C bus. 3-axis Gyroscope The MPU-6050 consist of a 3 axis gyroscope which can detect rotational velocity along...

Interfacing GPS with Arduino

GPS stands for Global Positioning System. GPS module find the location (latitude, longitude, altitude) by comparing the time taken for receiving signals from satellites in its vicinity. GPS offers a great accuracy and also provides other data besides position coordinates. Components Required Arduino Uno GPS Breadboard Connecting Wires Hardware Circuit Diagram Interfacing GPS with Arduino - Circuit Diagram Connections Connect TX pin of GPS Module to pin number 4 of Arduino Uno. Connect RX pin of GPS Module to pin number 3 of Arduino Uno. Connect Red wire...

>