Author - Basamma B

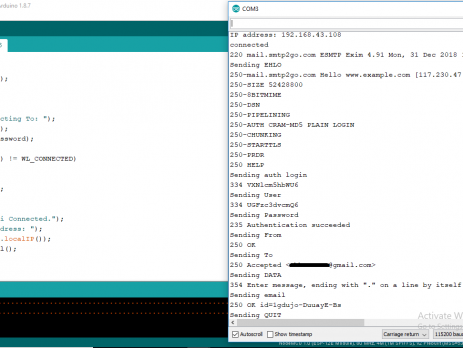
Sending E-mail from ESP8266 – IoT Project

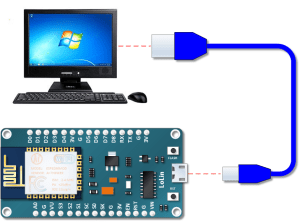
The scope of the IoT applications is growing from controlling appliances to monitoring devices (like sensors) and sending e-mails. So here I am writing an article on Sending Email from ESP8266 and it will be a step forward in the IoT Implementation. Components Required ESP8266 Breadboard USB Cable Software SMTP Server Setup In order to send e-mail from ESP8266 Module, we need to use the SMTP protocol. Hence, an SMTP Server is required to send the e-mails and the ESP8266 will act as an SMTP...

Controlling LED using ESP8266 and Telegram Bot – IoT Project

In this project we will control an LED which is connected to ESP8266 with a Telegram bot. Hope you know about Telegram, it is a messenger app similar to Whatsapp. This enables users to control their ESP8266 via simply typing and sending commands in Telegram. By adding some relays or TRIAC you can make this a home automation project. Components Required ESP8266 LED 470Ω Resistor Breadboard USB Cable Connecting Wires Hardware Circuit Diagram Home Automation using ESP8266 and Telegram Bot - Circuit Diagram Software Telegram Bot Bots...

Updating Sensor Data to Google Spreadsheet using ESP8266 – IoT Project

In IoT applications, the monitored sensor data needs to be recorded. This data logging is important for data analytics. So in this tutorial, we will record the sensor captured data in a Google spreadsheet. Components Required ESP8266 10KΩ Potentiometer Breadboard USB Cable Connecting Wires Hardware Circuit Diagram Updating Sensor Data to Google Spreadsheet using ESP8266 - Circuit Diagram Software Google Spreadsheet Creation Login to your Gmail account and open Google Drive. Create a new folder, name it and open the folder. Inside the folder right click and...

Flashing Espressif and NodeMCU Firmware to ESP8266

In the earlier articles, we have written our own program in Arduino IDE to access GPIO pins of ESP8266 or to interface sensors to ESP8266. But if we write our own program to access GPIO Pins, the existing firmware will be completely erased and the new program will be written on the ESP8266. So in this article, we will explain how to flash the Official Espressif and NodeMCU Firmware to ESP8266. This can also be used to update to the latest ESP8266...

Home Automation using ESP8266 & Blynk App – IoT

A home automation system is an automating the bulk of electronic and electrical tasks within a home. It uses a combination of hardware and software to enable control and management over appliances and devices within a home. Home automation not only refers to reduce human efforts but also energy efficiency and time saving. Here we are performing home automation by using ESP8266 - WiFi SoC and Blynk Playstore App. Components Required ESP8266 470Ω Resistor LED Breadboard USB Cable Connecting Wires Android Phone with Blynk App Hardware Circuit Diagram Home-Automation-using-using-ESP8266-Blynk-App-Circuit-Diagram Circuit Diagram...

ESP8266 as MQTT Client – Arduino IoT

IoT or Internet of Things is an emerging technology which enables us to create a network of devices, sensors, actuators to connect and exchange data. MQTT (Message Queuing Telemetry Transport) is one of the commonly used protocol in this field. It consists of MQTT Broker and MQTT Clients. Where MQTT Broker is the server through which all MQTT Clients are communicating each other. CloudMQTT provides MQTT Broker as a service, which we are using in this tutorial. In this project we...

Interfacing DHT11 Sensor with ESP8266

In this article, I am going to explain about interfacing of DHT11 sensor with ESP8266. For that we have to make only 3 connections between the DHT11 sensor and ESP8266. For the working demonstration we will be programing ESP8266 as a web server for displaying temperature and humidity in a web browser as per request. Components Required ESP8266 DHT11 Sensor USB Cable Connecting Wires Hardware Circuit Diagram Interfacing DHT11 Sensor with ESP8266 - Circuit Diagram Connections DHT11 sensor (+) pin will be connected to 3.3V DHT11 sensor...

Calling API using ESP8266

The objective of this tutorial is to explain how to do HTTP JSON GET requests using an ESP8266 and Arduino IDE. Components Required ESP8266 USB Cable Hardware Connect ESP8266 to Computer   Software Code #include <ESP8266WiFi.h> #include <ESP8266HTTPClient.h> #include <ArduinoJson.h> const char* ssid = "SERVER NAME"; const char* password = "SERVER PASSWORD"; void setup() { Serial.begin(115200); WiFi.begin(ssid, password); while (WiFi.status() != WL_CONNECTED) { delay(1000); Serial.println("Connecting..."); } } void loop() { if (WiFi.status() == WL_CONNECTED) { HTTPClient...

>