

ESP8266 as MQTT Client – Arduino IoT
Contents
IoT or Internet of Things is an emerging technology which enables us to create a network of devices, sensors, actuators to connect and exchange data. MQTT (Message Queuing Telemetry Transport) is one of the commonly used protocol in this field. It consists of MQTT Broker and MQTT Clients. Where MQTT Broker is the server through which all MQTT Clients are communicating each other. CloudMQTT provides MQTT Broker as a service, which we are using in this tutorial.
In this project we are controlling an LED connected to ESP8266 from a mobile app using MQTT protocol. Here we are using free plan of CloudMQTT for this or you can use any other MQTT broker of your choice.
Components Required
- ESP8266
- 470Ω Resistor
- LED
- Breadboard
- USB Cable
- Connecting Wires
Hardware
Circuit Diagram

Software
Creating Account in CloudMQTT – MQTT Broker
- Firstly we have to create an account in CloudMQTT.
- Enter your email ID at “Create account”, then click on Sign up.
- CloudMQTT server will send you the verification mail to the provided email address.
- Login into your email ID, Open the Confirm email which is sent by CloudMQTT and Click on Confirm email icon.
- Enter the Password to your CloudMQTT account (according to your wish), Confirm the password, select :Yes” option for agreement and consent and click on “Submit” icon.
- Click on “Create new instance” (which is present on top right side of the browser).
- Enter “Name” for instance to create, example: CloudMQTT.
- Click on “Select Region” and next click on “confirm”.
- Then click on “Create instance” to complete the instance creation.
- After the creation of new instance, we need to note down the instance Name, Server, User, Password and Port details.

Programming ESP8266 – MQTT Client
Arduino Code
#include <EEPROM.h>
#include <ESP8266WiFi.h>
#include <PubSubClient.h>
#include <Wire.h>

const char *ssid = "SERVER NAME";
const char *password = "SERVER PASSWORD";
const char *mqtt_server = "m11.cloudmqtt.com";
const char *device_id = "esp8266";

WiFiClient espClient;
PubSubClient client(espClient);

const byte ledPin5 = 16;
char message_buff[100];

void callback(char *led_control, byte *payload, unsigned int length)
{
  Serial.print("Message arrived [");
  Serial.print(led_control);
  Serial.println("] ");
  int i;
  for (i = 0; i & length; i++)
  {
    message_buff[i] = payload[i];
  }
  message_buff[i] = '\0';

  String msgString = String(message_buff);
  Serial.println(msgString);
  if (strcmp(led_control, "esp8266/led_control") == 0)
  {
    if (msgString == "1")
    {
      digitalWrite(ledPin5, LOW); // PIN HIGH will switch OFF the relay
    }
    if (msgString == "0")
    {
      digitalWrite(ledPin5, HIGH); // PIN LOW will switch ON the relay
    }
  }
}

void reconnect()
{
  while (!client.connected())
  {
    Serial.print("Attempting MQTT connection...");
    if (client.connect(device_id, "cloud_username", "cloud_password"))
    {
    Serial.println("connected");
    client.subscribe("esp8266/led_control"); // write your unique ID here
    }
    else
    {
      Serial.print("failed, rc=");
      Serial.print(client.state());
      Serial.println(" try again in 5 seconds");
      delay(5000);
    }
  }
}

void setup()
{
  Serial.begin(115200);

  client.setServer(mqtt_server, 1883); // change port number as mentioned in your cloudmqtt console
  client.setCallback(callback);

  pinMode(ledPin5, OUTPUT);
}

void loop()
{
  if (!client.connected())
  {
    reconnect();
  }
  client.loop();
}
Code Explanation
We are including ESP8266 WiFi library which provides ESP8266 specific WiFi routines and we are calling it to connect to the network. PubSubClient library allows a client to publish/subscribe messaging with a MQTT support server.
#include <EEPROM.h>
#include <ESP8266WiFi.h>
#include <PubSubClient.h>
#include <Wire.h>
Get and enter the “ssid” and “password” i.e., your WiFi name and password.
const char *ssid = "SERVER NAME";
const char *password = "SERVER PASSWORD";
Get and enter the “MQTT Server” name and uniqueID. Assign the MQTT as a client to ESP8266.
const char *mqtt_server = "m11.cloudmqtt.com";
const char *device_id = "esp8266";
WiFiClient espClient;
PubSubClient client(espClient);
Select a digital pin D5 of NodeMCU to perform LED control operation and initialize an array message_buff with the type char.
const byte ledPin5 = 14;
char message_buff[100];
We are writing a function to read the characters from serial monitor and controlling the LED ON and OFF based on the instructions which is passing from MQTT Dashboard Play Store application.
void callback(char *led_control, byte *payload, unsigned int length)
{
  Serial.print("Message arrived [");
  Serial.print(led_control);
  Serial.println("] ");
  int i;
  for (i = 0; i & length; i++)
  {
    message_buff[i] = payload[i];
  }
  message_buff[i] = '\0';

  String msgString = String(message_buff);
  Serial.println(msgString);
  if (strcmp(led_control, "esp8266/led_control") == 0)
  {
    if (msgString == "1")
    {
      digitalWrite(ledPin5, LOW);
    }
    if (msgString == "0")
    {
      digitalWrite(ledPin5, HIGH);
    }
  }
}
Actual connection to MQTT server is initialized by calling the below instructions. We have to enter our cloudmqtt user name, password and uniqueID in respective place. If client connected, then we can control operation of the NodeMCU connected LED via MQTT Dash app.
void reconnect()
{
  while (!client.connected())
  {
    Serial.print("Attempting MQTT connection...");
    if (client.connect(device_id, "CLOUD USER NAME", "CLOUD PASSWORD"))
    {
      Serial.println("connected");
      client.subscribe("esp8266/led_control");
    }
If client not connected then it will try to connect again and again for every 5 seconds.
else
    {
      Serial.print("failed, rc=");
      Serial.print(client.state());
      Serial.println(" try again in 5 seconds");
      delay(5000);
    }
  }
}
Put your setup or configuration code in the setup function, it will only run once during the startup.
Here in the setup function, it will connect to WiFi Network and also initialize serial communication for debugging and logging with a baud rate of 115200. Please change port number as mentioned in your cloudmqtt console. Setting mode of operation as output for D5 pin of NodeMCU.
void setup()
{
  Serial.begin(115200);
  client.setServer(mqtt_server, 1883);
  client.setCallback(callback);

  pinMode(ledPin5, OUTPUT);
}
Put your main code in void loop() function to run repeatedly. This continuously waits and checks for a client to connect.
void loop()
{
  if (!client.connected())
  {
    reconnect();
  }
  client.loop();
}
Setting up Mobile App – MQTT Client
- Install MQTT Dash application in your Mobile from Play Store.
- Click “+” icon which is located on top right side of the app.
- Add the credentials of created instance (Which you have note down from www.cloudmqtt.com created account) to app and click on save icon (which located on top right corner of the app).
- Click on the added instance ex: CloudMQTT, then pop-up window will appear.
- Click on “+” icon (which is located on top right side of the app).
- “Choose type” as “Switch/button” then pop-up window will appear.
- Create a Button with the user selected name and Topic(sub) as “esp8266/led_control”.
- Check the output by clicking on the created Button icon in app and operation of the LED will be controlled by Button icon.

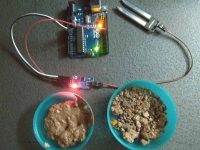
Working
In this project we have 3 parts, MQTT Dash (mobile app – MQTT Client), CloudMQTT (MQTT Broker as a service) and ESP8266 Circuit (led control circuit – MQTT Client). Our mobile app is sending commands to ESP8266 circuit via MQTT broker. MQTT is a publish and subscribe protocol.
Practical Implementation


there’s an error with the code the line ( message_buff[i] = ‘\0’; ) should be inside the for loop because it sets the message sent to always be null
message_buff remains nil
Wondering why there’s no WiFi.begin and related connecting message in your code.. . Added that myself.
I had the same problem and I created a new instance and it worked. I don’t know why it couldn’t stablish communication with the first one because everything was correct but maybe it helps you too.
can’t connect to cloud
The code is corrected now.
It is corrected now.
Hi,
The code is updated. Kindly check it in the above article.
Yeah, I got the same thing.
lt ?
led_control ?
was not declared in this scope
Good but, the arduino code needs some update, it still have some errors: Because on the line Serial.print(led_control); led_control was never declared. Next, on the for loop, “lt” was not declared either.