

Interfacing Matrix Keypad with PIC Microcontroller using MikroC Library
Contents
I already posted about Interfacing Matrix Keypad with PIC Microcontroller with some user-defined functions. Advantages in using user-defined functions are we can extend it up to any number of keys and able to customise according to our application. The MikroC Pro for PIC Microcontrollers provides a library for working with 4*4 keypad. It can also be used to interface 4*3, 4*2 and 4*1 keypads.
MikroC provides the following three functions to interface Matrix Keypad.
- Keypad_Init
- Keypad_Key_Press
- Keypad_Key_Click
Keypad_Init
Prototype: void Keypad_Init(void);
It initializes a particular port for working with keypad. A global variable ‘keypadPort’ must be defined before using this function. Port need to be initialized before calling this function.
Keypad_Key_Press
Prototype: char Keypad_Key_Press(void);
This function reads key when a key is pressed and it returns number corresponding (1 – 16) to the pressed key. If no key is pressed, it will return 0.
Keypad_Key_Click
Prototype: char Keypad_Key_Click(void);
When this function is called, it waits until some key is pressed and released. When released it returns number corresponding (1 – 16) to the pressed key. If no key is pressed, it will return 0. If more than one key is pressed, the function waits until all pressed keys are released and returns number corresponds to first pressed key. Port need to be initialized before calling this function.
For demonstration of the working, here we will use a 4*3 keypad. The pressed key and number of times a particular key is pressed in displayed in LCD Display.
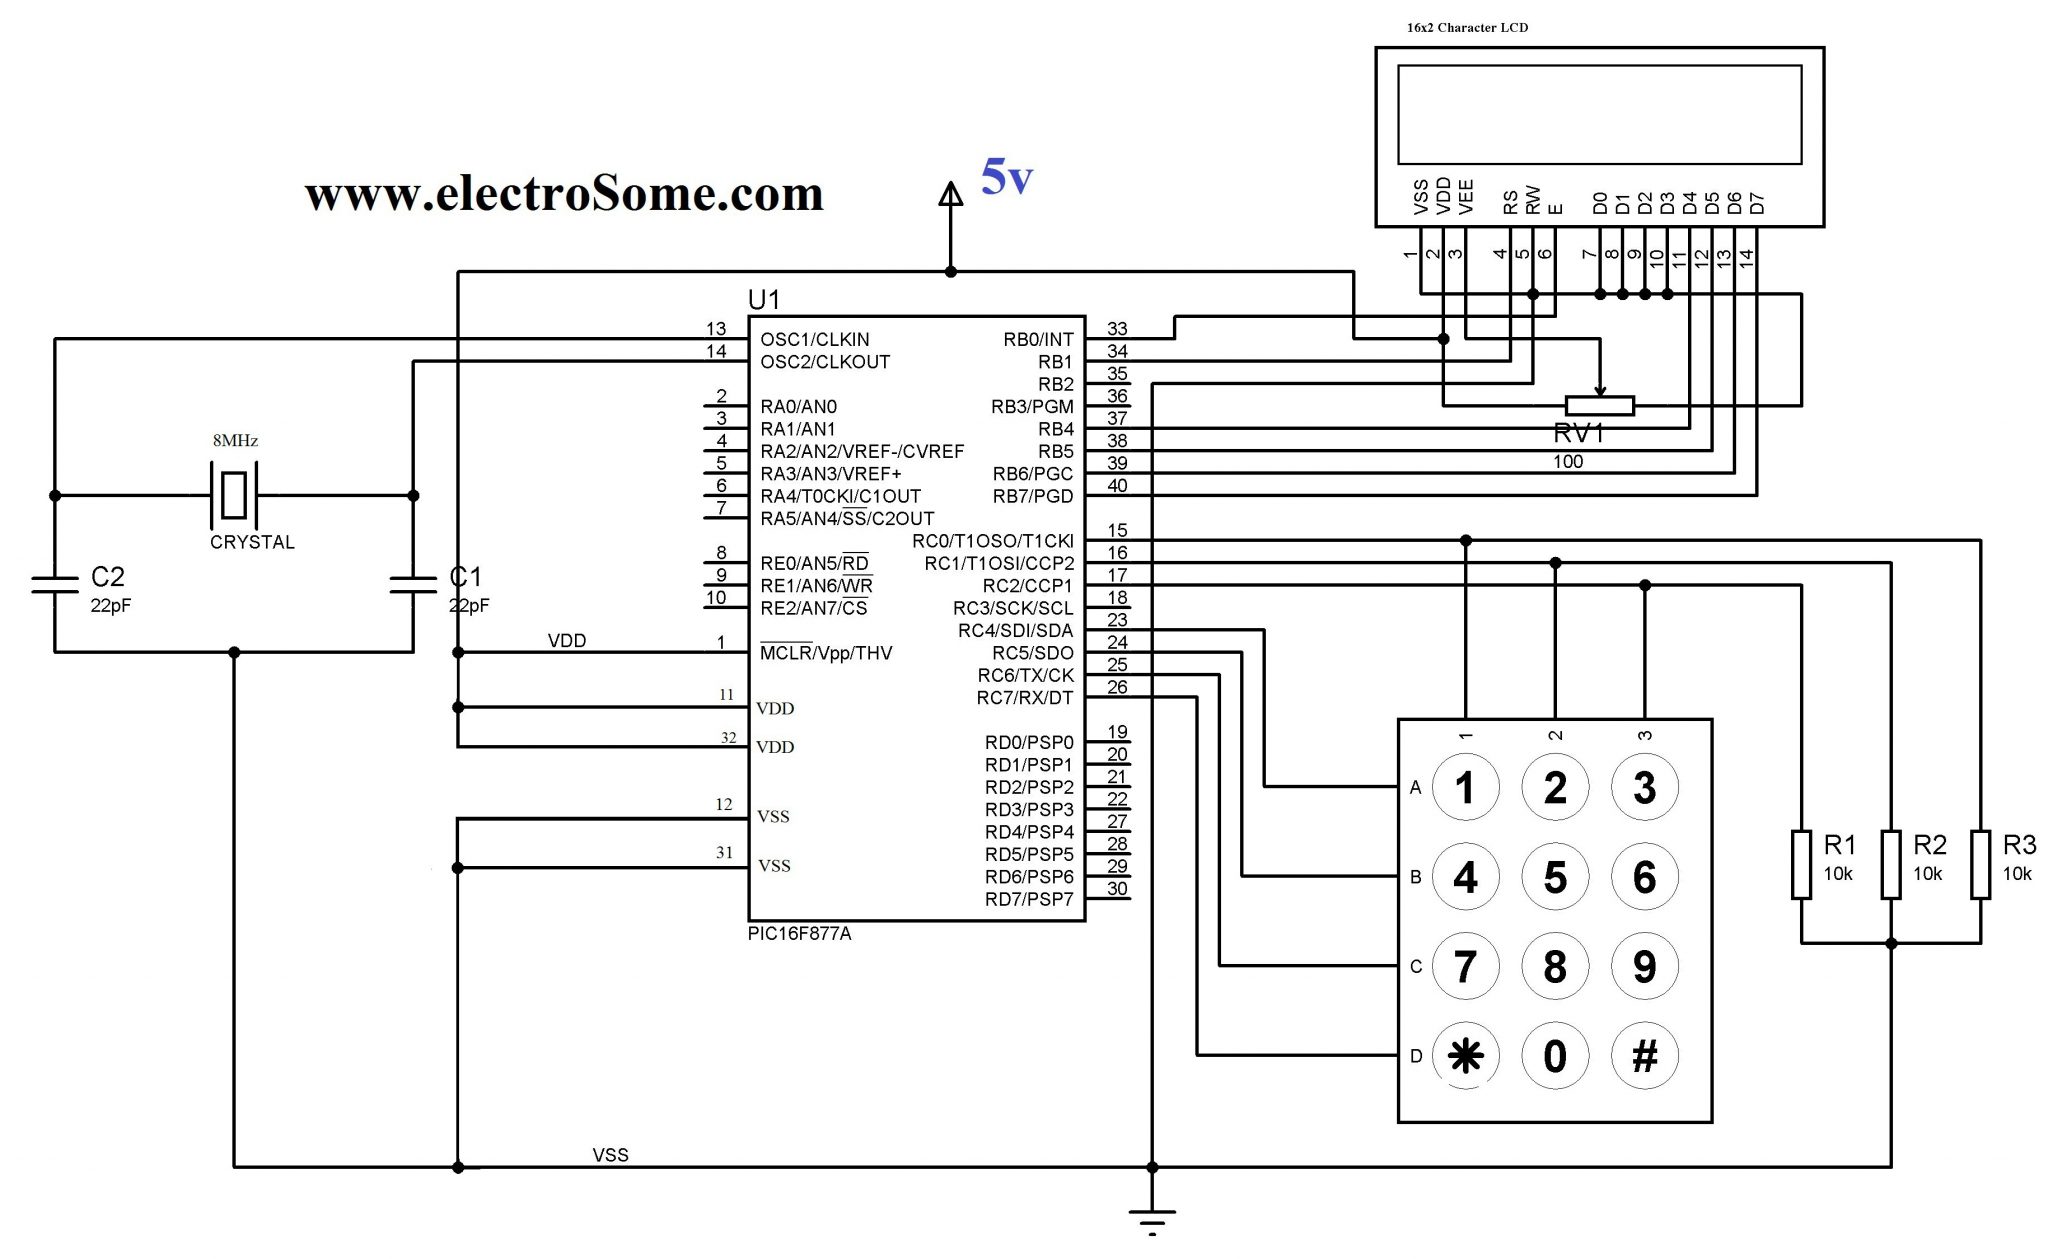
Circuit Diagram:
MikroC Code:
unsigned short kp, cnt, oldstate = 0;
char txt[6];
// Keypad module connections
char keypadPort at PORTC;
// End Keypad module connections
// LCD module connections
sbit LCD_RS at RB1_bit;
sbit LCD_EN at RB0_bit;
sbit LCD_D4 at RB4_bit;
sbit LCD_D5 at RB5_bit;
sbit LCD_D6 at RB6_bit;
sbit LCD_D7 at RB7_bit;
sbit LCD_RS_Direction at TRISB1_bit;
sbit LCD_EN_Direction at TRISB0_bit;
sbit LCD_D4_Direction at TRISB4_bit;
sbit LCD_D5_Direction at TRISB5_bit;
sbit LCD_D6_Direction at TRISB6_bit;
sbit LCD_D7_Direction at TRISB7_bit;
// End LCD module connections
void main()
{
  cnt = 0; // Reset counter
  Keypad_Init(); // Initialize Keypad
  Lcd_Init(); // Initialize Lcd
  Lcd_Cmd(_LCD_CLEAR); // Clear display
  Lcd_Cmd(_LCD_CURSOR_OFF); // Cursor off
  Lcd_Out(1, 1, "1");
  Lcd_Out(1, 1, "Key :"); // Write message text on Lcd
  Lcd_Out(2, 1, "Times:");
  do
  {
    kp = 0; // Reset key code variable
    // Wait for key to be pressed and released
    do
      //kp = Keypad_Key_Press(); // Store key code in kp variable
      kp = Keypad_Key_Click(); // Store key code in kp variable
    while (!kp);
    // Prepare value for output, transform key to it's ASCII value
    switch (kp)
    {
      case 1: kp = 49; break; // 1
      case 2: kp = 50; break; // 2
      case 3: kp = 51; break; // 3
      //case 4: kp = 65; break; // A commented since 4th column is absent for 4*3 keypad
      case 5: kp = 52; break; // 4
      case 6: kp = 53; break; // 5
      case 7: kp = 54; break; // 6
      //case 8: kp = 66; break; // B commented since 4th column is absent for 4*3 keypad
      case 9: kp = 55; break; // 7
      case 10: kp = 56; break; // 8
      case 11: kp = 57; break; // 9
      //case 12: kp = 67; break; // C commented since 4th column is absent for 4*3 keypad
      case 13: kp = 42; break; // *
      case 14: kp = 48; break; // 0
      case 15: kp = 35; break; // #
      //case 16: kp = 68; break; // D
    }
    if (kp != oldstate)
    { // Pressed key differs from previous
      cnt = 1;
      oldstate = kp;
    }
    else
    { // Pressed key is same as previous
      cnt++;
    }
    Lcd_Chr(1, 10, kp); // Print key ASCII value on Lcd
    if (cnt == 255)
    { // If counter varialble overflow
      cnt = 0;
      Lcd_Out(2, 10, " ");
    }

    WordToStr(cnt, txt); // Transform counter value to string
    Lcd_Out(2, 10, txt); // Display counter value on Lcd
 } while (1);
}
You can download MikroC code, hex file, Proteus files etc here…..


You’ve got the connections of the keypad wrong. The resistors are supposed to be connected to the output of the keypad. Meaning, you need 4 resistors R1 R2 R3 R4 connected to A, B, C, D respectively.
Make sure that your keypad is functioning correctly using a multimeter.
The keypad is not working properly. The 2nd and 3rd row are okay but the 1st and 4th are not. Btw, I am using 16f877a. I also checked the data sheet for the keypad and my connections are correct.
Your keypad connections will be wrong, try changing it.
hi Ligo, I have tried above code but LCD displays wrong numbers, if I press on keypad 2, it displays 4! and so on.. I am using 4×4 keypad (numbers printed on it)
Sorry, I don’t get what you are asking…
Hope that following link will help you ..
http://electrosome.com/pic-to-pic-communication-uart/
http://electrosome.com/pic-to-pic-communication-uart/3/
hy…if I want to match keypad and uart with 2 lcd by using pic16f877a.. how about the coding???anyone can help me..
tried this code and it works try your hardware and see if you ground your LCD correctly.
edit and remove ths ascii values that are not necessary and it will work
this code is running in proties but not working in hardware, in hardware problem plz suggest me , i m working on 16f877a