

Web Controlled Servo Motor – Arduino – IoT Project
Contents
Internet of things has taken over all the heavy loads from human to itself. IoT is an ecosystem of connected physical objects that are accessible through the internet. As Automation is used to help mankind in various environments if we combine the automation and Internet of things we can achieve more than we can think of.
In this project, we are going to control the servo motor from webpage by using Arduino Uno. The webpage will be created using ESP8266 module. The servo motor will be controlled by moving the slider on webpage.
Components Required
- Arduino Uno
- Servo motor (sg90)
- Esp8266
- Esp-01 adapter
- Connecting wires
Hardware
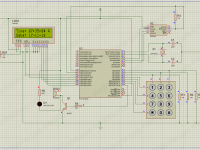
Circuit Diagram

Circuit Explanation
a) Connect the ESP8266 with Arduino : We have used an adapter to connect the ESP8266 with Arduino which will make the connection easier. The adapter has 5 to 3.3V regulator and so no need to connect any external resistors with it.
- Connect the GND of adapter to the GND of Arduino
- Connect the VCC of adapter to the 5V of Arduino
- Connect the RX pin of adapter to the pin 2 of Arduino
- Connect the TX pin of adapter to the pin 3 of Arduino
b) Connect the servo motor with Arduino : Rig up the circuit connection for Arduino with servo motor as mentioned below.
- Connect Black wire of servo motor to the GND pin of Arduino
- Connect Red wire of servo motor to the 5V pin of Arduino
- Connect Yellow wire of servo motor to the pin 8 of Arduino
Software
Arduino Uno Program
#include <SoftwareSerial.h>
#include <Servo.h>
SoftwareSerial esp8266(2,3);
#define DEBUG true
#define sg90_pin 8
Servo sg90;
int current_position = 170;
int vel = 10;
int minimum_position = 20;
int maximum_position = 160;

void setup()
  {
    sg90.attach(sg90_pin);
    sg90.write(maximum_position);
    sg90.detach();
    Serial.begin(9600);
    esp8266.begin(9600);
    esp8266Data("AT+RST\r\n", 2000, DEBUG); //reset module
    esp8266Data("AT+CWMODE=1\r\n", 1000, DEBUG); //set station mode
    esp8266Data("AT+CWJAP=\"ZONG MBB-E8372-5297\",\"82838379\"\r\n", 2000, DEBUG);   //connect wifi network

    while(!esp8266.find("OK")) { //wait for connection
      }
    esp8266Data("AT+CIFSR\r\n", 1000, DEBUG);
    esp8266Data("AT+CIPMUX=1\r\n", 1000, DEBUG);
    esp8266Data("AT+CIPSERVER=1,80\r\n", 1000, DEBUG);
  }

void loop()
  {
    if (esp8266.available())
      {
        if (esp8266.find("+IPD,"))
          {
            String msg;
            esp8266.find("?");
            msg = esp8266.readStringUntil(' ');
            String command = msg.substring(0, 3);
            String valueStr = msg.substring(4);
            int value = valueStr.toInt();

            if (DEBUG)
              {
                Serial.println(command);
                Serial.println(value);
              }
            delay(100);

            //move servo1 to desired angle
              if(command == "sr1")
                {
                  //limit input angle
                  if (value >= maximum_position)
                    {
                      value = maximum_position;
                    }
                   if (value <= minimum_position)
                     {
                       value = minimum_position;
                     }
                  sg90.attach(sg90_pin); //attach servo
                  while(current_position != value)
                    {
                      if (current_position > value)
                        {
                          current_position -= 1;
                          sg90.write(current_position);
                          delay(100/vel);
                        }
                      if (current_position < value)
                        {
                          current_position += 1;
                          sg90.write(current_position);
                          delay(100/vel);
                        }
                    }
                  sg90.detach(); //dettach
              }
          }
      }
  }

String esp8266Data(String command, const int timeout, boolean debug)
  {
    String response = "";
    esp8266.print(command);
    long int time = millis();
    while ( (time + timeout) > millis())
      {
        while (esp8266.available())
          {
            char c = esp8266.read();
            response += c;
          }
      }
    if (debug)
      {
        Serial.print(response);
      }
    return response;
  }
Code Explanation
First of all, include the libraries for software serial and servo. The software serial library will help us in using the TX and RX communication on other pins of Arduino. The servo library will help us in moving the servo easily. After that, define the pins for ESP8266 and servo motor.
#include <SoftwareSerial.h>
#include <Servo.h>
SoftwareSerial esp8266(2,3);
#define DEBUG true
#define sg90_pin 8
Then in the setup function, we have to specify the Arduino pins with servo motor and we have to move the motor to maximum position. Set the Baud Rate as 9600 fro Serial communication and ESP8266. Baud Rate of ESP8266 varies according to which type of ESP8266 you are using. Your esp8266 might have different baud rate.
sg90.attach(sg90_pin);
sg90.write(maximum_position);
sg90.detach();
Serial.begin(9600);
esp8266.begin(9600);
The following commands connect the ESP8266 to wifi network and It will set the web server at IP address. It will display the port value on serial monitor after uploading the code.
esp8266Data("AT+RST\r\n", 2000, DEBUG); //reset module
esp8266Data("AT+CWMODE=1\r\n", 1000, DEBUG); //set station mode
esp8266Data("AT+CWJAP=\"ZONG MBB-E8372-5297\",\"82838379\"\r\n", 2000, DEBUG);   //connect wifi network
while(!esp8266.find("OK"))
  { //wait for connection
  }
esp8266Data("AT+CIFSR\r\n", 1000, DEBUG);
esp8266Data("AT+CIPMUX=1\r\n", 1000, DEBUG);
esp8266Data("AT+CIPSERVER=1,80\r\n", 1000, DEBUG);
Arduino wait for the data to be received from web page. If the Slider on the webpage moved, then that slider movement information will be sent to Arduino via ESP8266. The Arduino controls the movement of the servo motor according to the value received by web page via ESP8266.
if (esp8266.available())
  {
    if (esp8266.find("+IPD,"))
      {
        String msg;
        esp8266.find("?");
        msg = esp8266.readStringUntil(' ');
        String command = msg.substring(0, 3);
        String valueStr = msg.substring(4);
        int value = valueStr.toInt();
The following function will send the commands to ESP8266 and will print the response of the ESP8266 on serial monitor.
String esp8266Data(String command, const int timeout, boolean debug)
  {
    String response = "";
    esp8266.print(command);
    long int time = millis();
    while ( (time + timeout) > millis())
      {
        while (esp8266.available())
          {
            char c = esp8266.read();
            response += c;
          }
      }
HTML + JavaScript
<!DOCTYPE html >
<html>
<head>
<title>Web controlled Servo</title>
<script src="jquery.js"></script>
</head>

<body>
<h1> <b> Arduino Web Controlled Servo by Electrosome </b> </h1>
<h4> <b> Enter the IP address below </b> </h4>
<div style="margin: 0; width:500px; height:80px;">
<FORM NAME="form" ACTION="" METHOD="GET">
ESP8266 IP Address:
<INPUT TYPE="text" NAME="inputbox" VALUE="192.168.0.9">
</FORM>
</div>
<h3> Scroll it to move the servo </h3>
<input type="range" min="20" max="170" onmouseup="servo1(this.value)" />
</body>

<script>
$.ajaxSetup({timeout:1000});
function servo1(angle)
{
    TextVar = form.inputbox.value;
    ArduinoVar = "http://" + TextVar + ":80";
    $.get( ArduinoVar, { "sr1": angle })           ;
    {Connection: close};
}
</script>
</html>
Here we are using jQuery library to send data to Arduino via HTTP GET request. Arduino is programed as a HTTP server listening on port 80.
There are basically two fields in the html page.
1. Text Box for entering IP address
2. Servo Angle range selector
Whenever there is a change in the range, onmouseup event is triggered and it will call the JavaScript function servo1(). This function will read the IP address from the text box and will send an HTTP GET request to Arduino using jQuery get(). sr1 is the http get parameter which carrying the angle to which servo needs to rotate.
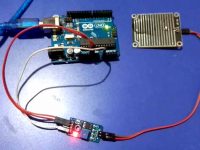
Practical Implementation of Circuit

Working
To control the servo motor through the webpage, we will have to make a webpage using the HTML language. The HTML code we created for our project can be downloaded from the end of this article. If you want to rename the file, then change the filename but make sure that it has “.html” at the end.
After that, download the JQUERY file which is also given at the end and place this file in the same folder where you have placed the HTML file. Next open the HTML file and the webpage will look like as mention in the image below.

Now, change the wifi name and password in the Arduino code with your wifi name and password and upload the code. Open the serial monitor and it will display the IP address as shown in the below figure

Type the IP address on the web page which is displayed on the serial monitor.
Now move the slider on the web page. That slider movement information will be send to Arduino via ESP8266. Arduino controls the servo motor movement according to the movement of the slider on web page.
Video
Download Here
Click in the below link to download the html and jquery files


At AT+CWJAP
esp8266Data(“AT+CWJAP=”SSID”,”PASS”rn”, 2000, DEBUG);
where to change the wifi name
WHERE DO U CHANGE THE WIFI NAME