

Digital Thermometer using LM35 Sensor and ESP8266
Contents
In this project, we are going to monitor the current room temperature over internet using ESP8266 programmed as a web server. It is accomplished by establishing data communication between ESP8266 WiFi module and LM35 temperature sensor using ADC.
Components Required
- ESP8266
- LM35
- Breadboard
- Connecting Wires
Hardware
Circuit Diagram

Circuit Connection
- Connect 3.3V pin of ESP8266 to first pin of LM35
- Connect A0 pin of ESP8266 to second pin of LM35
- Connect GND pin of ESP8266 to third pin of LM35
LM35
An LM35 is a 3 pin temperature sensor. It gives output in voltage according to the temperature, having a accuracy of 10mV per degree celsius. It can measure temperatures in the range of -55°C to 150°C and it operates from 4V to 20V. It’s output voltage is proportional to the temperature i.e., higher the temperature, higher is the output voltage.
The output voltage of this sensor can be easily converted to digital form using an ADC so that a microcontroller can easily process it.
Software
Code
#include <ESP8266WiFi.h>

const char* ssid = "YOUR WIFI NAME (SSID)";
const char* password = "YOUR WIFI PASSWORD";

float temp=0;
int analog= 0;
WiFiServer server(80);

void setup()
{
  Serial.begin(115200);
  delay(10);

  // Connect to Wi-Fi network
  Serial.println();
  Serial.println();
  Serial.print("Connecting to Internet ");
  Serial.println(ssid);

  WiFi.begin(ssid, password);

  while (WiFi.status() != WL_CONNECTED)
  {
    delay(500);
    Serial.print(".");
  }
  Serial.println("");
  Serial.println("WiFi connected");

  /*-------- server started---------*/
  server.begin();
  Serial.println("Server started");

  /*------printing ip address--------*/
  Serial.print("IP Address of network: ");
  Serial.println(WiFi.localIP());
  Serial.print("Copy and paste the following URL: https://");
  Serial.print(WiFi.localIP());
  Serial.println("/");
}

void loop()
{
  WiFiClient client = server.available();
  if (!client)
  {
    return;
  }
  Serial.println("Waiting for new client");
  while(!client.available())
  {
    delay(1);
  }
  String request = client.readStringUntil('\r');
  Serial.println(request);
  client.flush();
  client.println("HTTP/1.1 200 OK");
  client.println("Content-Type: text/html");
  client.println("");
  client.println("<!DOCTYPE HTML>");
  client.println("<HTML>");
  client.println("<meta http-equiv=\"refresh\" content=\10\">");

  client.println("LM35 Temperature Sensor");

  client.println("<br><br>");
  client.println("Temperature:");
  analog= analogRead(17);
  temp = analog*0.48828125;
  client.print(temp);
  client.println(" degrees Celsius ");
  client.println("<br><br>");
  client.println("<html>");

  delay(1);
  Serial.println("Client disconnected");
  Serial.println("");
}
Code Explanation
We are including ESP8266 WiFi library which provides ESP8266 specific WiFi routines, which we are calling to connect to the WiFi network.
#include <ESP8266WiFi.h>
Get and enter the “ssid” and “password” i.e., your WiFi name and password.
const char* ssid = "YOUR WIFI NAME (SSID)";
const char* password = "YOUR WIFI PASSWORD";
Initialize the variables to read temperature value. Start the server, initialize the serial communication with baudrate 115200.
float temp=0;
int analog= 0;
WiFiServer server(80);

void setup()
{
  Serial.begin(115200);
  delay(10);
Actual connection to WiFi is initialized by calling below instructions.
  Serial.println();
  Serial.println();
  Serial.print("Connecting to Internet ");
  Serial.println(ssid);

  WiFi.begin(ssid, password);
Connection process can take couple of seconds. While() loop checks the module connection with WiFi. If it is connected to WiFi then it will display WiFi connected message on serial monitor and web server starts, otherwise it will keep displaying “dots (……)” in the serial monitor.
  while (WiFi.status() != WL_CONNECTED)
  {
    delay(500);
    Serial.print(".");
  }
  Serial.println("");
  Serial.println("WiFi connected");

  server.begin();
  Serial.println("Server started");
It is printing the IP address of our ESP8266 module which is given by the DHCP server running on the WiFi router. For accessing it, we need to connect our system to the same WiFi network (our system will get another IP address from the router DHCP server) and we need to enter the IP address of the ESP8266 in the browser of our system.
  Serial.print("IP Address of network: ");
  Serial.println(WiFi.localIP());
  Serial.print("Copy and paste the following URL: http://");
  Serial.print(WiFi.localIP());
  Serial.println("/");
}
Waiting and checking for a client to connect.
Note : Client means browser. When we are loading ESP8266 IP address in a browser it is actually sending a HTTP request to the ESP8266 web server listening on the TCP port 80.
void loop()
{
  WiFiClient client = server.available();
  if (!client)
  {
    return;
  }
  Serial.println("Waiting for new client");
  while(!client.available())
  {
    delay(1);
  }

  String request = client.readStringUntil('\r');
  Serial.println(request);
  client.flush();
HTML code to create a web page which displays the temperature value. ESP8266 reads the output voltage of LM35 temperature sensor using an ADC and calculates the temperature value.
  client.println("HTTP/1.1 200 OK");
  client.println("Content-Type: text/html");
  client.println("");
  client.println("<!DOCTYPE HTML>");
  client.println("<HTML>");
  client.println("<meta http-equiv=\"refresh\" content=\10\">");

  client.println("LM35 Temperature Sensor");

  client.println("<br><br>");
  client.println("Temperature:");
  analog= analogRead(17); // reading analog pin of ESP8266
  temp = analog*0.48828125; //
  client.print(temp);
  client.println("<br><br>");
  client.println("<html>");

  delay(1);
  Serial.println("Client disconnected");
  Serial.println("");
}
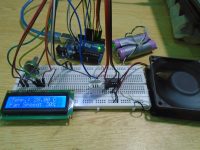
Practical Implementation of Circuit

Working
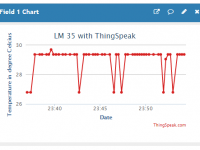
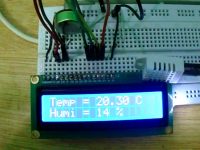
After uploading the code to ESP8266 module using Arduino IDE, open the Serial Monitor and press RST pin of ESP8266. It will display the connected WiFi name and IP address given by the DHCP server running on the WiFi router. Now copy that displayed IP address and paste in a browser. Then it will display that monitored temperature value on browser.
LM35 sensor is connected to A0 pin of NodeMCU module (ESP8266 analog pin 17). As explained above we can view the temperature using a web browser (eg. Google Chrome, Mozilla Firefox) by using the IP address of the ESP8266 WiFi module. When we enter the IP address in the browser, it will send an HTTP request (default port 80) to the module. On receiving the request ESP8266 will read the analog output given by the temperature sensor and send HTTP response.
How to monitor data over Internet ?
We are not going to explain this in detail in this tutorial. Most of the wifi routers available in the market supports DDNS (Dynamic DNS) and port forwarding. This can be used to access the web page served by ESP8266 over internet. In real IoT applications we need to connect ESP8266 to a internet server. We will explain those in next tutorials.

